
Webcam Lighting for Cam Models: A Complete Guide
Good lighting transforms how you look on camera. Your webcam can only work with the light it receives. When you add proper lighting, you remove blur, reduce noise, eliminate harsh shadows, and create clear video quality that viewers notice.
This guide covers what works for lighting setups at every budget level and experience stage.
Why lighting matters more than your camera
Your camera captures what the light reveals. A basic webcam with good lighting beats an expensive camera in poor lighting every time.
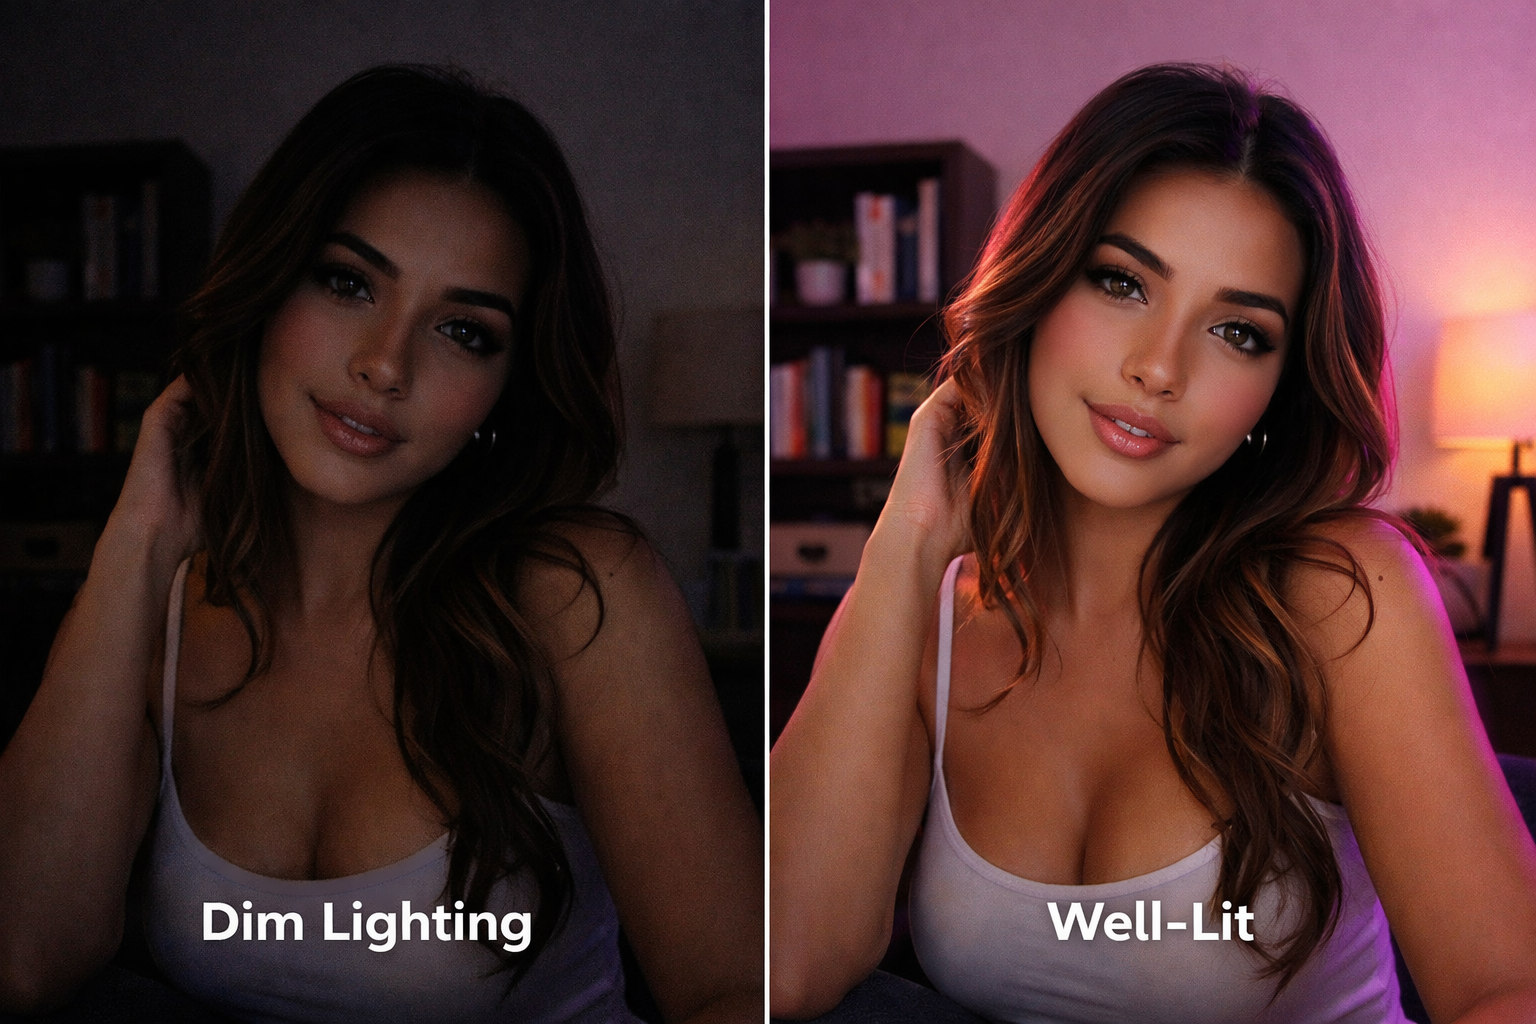
When you stream in dim conditions, your webcam increases gain to compensate. Gain amplifies the image signal but adds grain and washes out colors. The result looks low quality and unprofessional.
Proper lighting solves this problem. When your face receives enough light, the camera captures a clean image without grain or color distortion. Your face should be the brightest element in the frame.
Understanding color temperature
Color temperature affects how warm or cool your lighting appears. The measurement uses Kelvin (K).
Warm light sits between 2700K and 3200K. This creates a yellow or orange glow similar to candles or sunset. Cool light ranges from 5000K to 6500K and appears blue-white like daylight.
For webcam streaming, choose one color temperature for all lights that hit your face. Mixing warm and cool lights on your face creates uneven skin tones. Your face will look patchy or strange when different color temperatures meet.
You can use different temperatures for background lights to add mood and depth. Just keep the lights on your face consistent.
The three-point lighting system
Three-point lighting creates professional results with any equipment level. This setup uses three light positions to shape how you appear on camera.
The key light is your main light source. Place it in front of you at a 20 to 45 degree angle, slightly above eye level. This light should be your brightest source.
The fill light sits opposite your key light. This light fills in shadows created by the key light. Keep the fill light softer and less bright than your key light. You can use a reflector, a second light, or even your monitor screen.
The back light positions behind you. This light separates you from the background and adds depth to the frame. Keep this light dimmer than your key light.
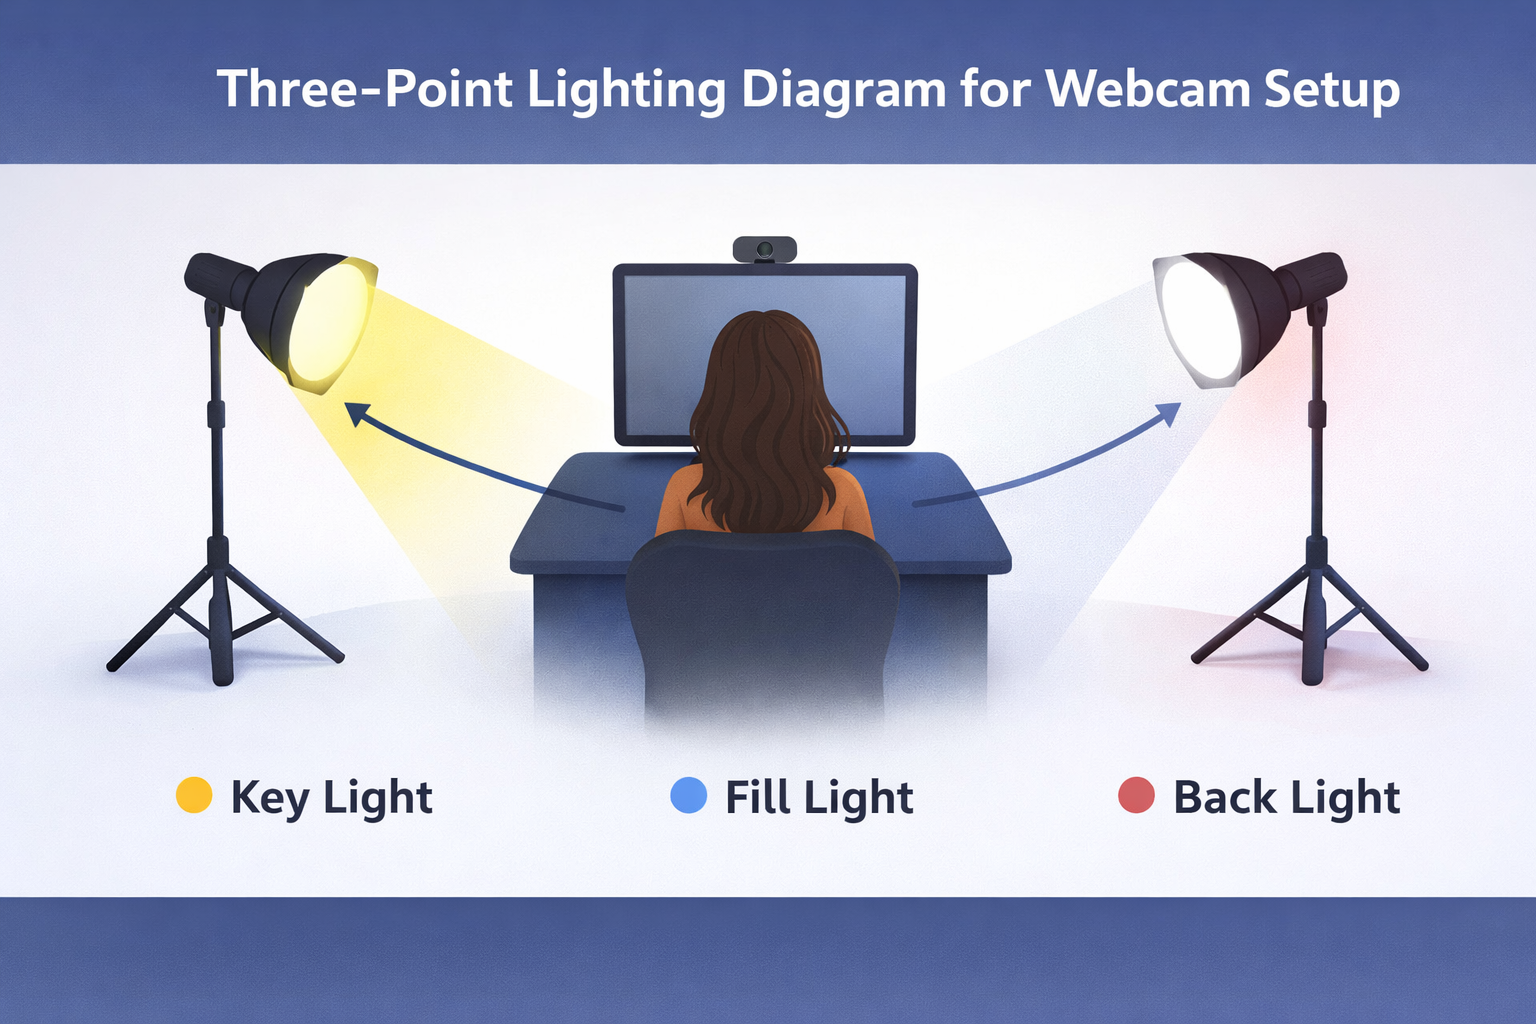
This system works whether you use expensive panels or basic equipment. The principle stays the same across all setups.
Types of lighting equipment
Different lighting equipment offers different benefits. Each type has strengths and limits.
Ring lights
Ring lights create even, shadowless lighting. The circular design surrounds your camera lens. These lights work well for close-up shots and eliminate dark spots under your eyes and nose.
Budget ring lights connect through USB cables. These work for phone content creation but lack brightness for serious streaming. Professional ring lights offer temperature control and brightness adjustment.
Check for adjustable settings before you buy. Ring lights without temperature control lock you into one color temperature.
LED panels
LED panels provide the most control. Two knobs adjust brightness and temperature. These panels stay compact and generate less heat than other options.
Quality LED panels offer Color Rendering Index (CRI) ratings above 90. High CRI makes skin tones look natural on camera. Budget panels may have lower CRI ratings that make colors appear dull.
Softboxes
Softboxes diffuse light through fabric panels. This creates soft, flattering light without harsh shadows. The diffusion spreads light evenly across your face.
The downside is size. Softboxes take up significant space. In small rooms, LED panels or ring lights make more sense.
Umbrella lights
Umbrella lights reflect light off a curved surface. Budget umbrella kits cost less than other options.
Most umbrella lights lack temperature and brightness controls. This limits how you can adjust your lighting as conditions change.
Essential features to look for
Some features make a significant difference in how you work with your lighting.
Remote controls let you adjust lighting without leaving your position. This saves time during streams when you need to change brightness or color.
App control takes this further. You control multiple lights from your phone. Make sure you buy from established brands that maintain their apps and provide customer support.
Temperature and brightness controls give you flexibility. You can adapt your lighting when you move, travel, or want different creative effects.
RGB capabilities add creative options. You can select any color for background effects or mood lighting. Some panels include RGB controls on the device. Others use phone apps.
Battery packs work for temporary setups or travel. Avoid using batteries during live streams. Your lights will die mid-stream when batteries drain. Keep battery-powered lights for short filming sessions.
Mounting options for your lights
How you mount your lights affects your setup’s flexibility and safety.
Floor tripods
Floor tripods work in any room and cost less than other mounting options. The legs need significant floor space to stay stable. Cramped spaces make floor tripods tip over and damage equipment.
Desktop tripods
Desktop tripods sit on your desk or nearby surfaces. These take up less floor space than full tripods. Check the maximum and minimum height range before you buy. Make sure the tripod won’t tip over when your light attaches.
C-clamps
C-clamps attach to desk edges or shelves. These mounts eliminate floor space issues and reduce the chance of knocking over your lights. Check the clamp width matches your furniture. Too much pressure from heavy equipment can damage surfaces.
Wall and ceiling brackets
Permanent brackets free up all floor and desk space. Adjustable brackets let you reposition lights as you change angles.
Mount brackets into wall studs. Mounting into drywall without stud support will destroy your wall and drop equipment on you.
What CRI means for your lighting
CRI stands for Color Rendering Index. This measures how accurately light shows colors compared to natural sunlight. The scale runs from 0 to 100.
Sunlight scores 100. High CRI lights (90+) make skin tones appear natural and balanced. Low CRI lights (70–80) make colors look dull or slightly off. Your beige wall might look greenish under cheap LEDs.
This applies to your skin. Good CRI shows natural, even skin tones. Poor CRI makes skin look uneven or strange on camera.
CRI relates to LED quality. Higher prices usually mean better CRI. You don’t need high CRI equipment when you start. Once you earn more and reinvest in your setup, upgrading to a 90+ CRI key light makes a noticeable impact on your stream quality.
Common lighting mistakes
These mistakes reduce your stream quality. Most are easy to fix once you know what to look for.
Mixing warm and cool lights creates uneven skin tones. One yellow light and one white light make your face look off. Keep all face lights at the same temperature.
Relying on ceiling lights creates unflattering shadows around your eyes and nose. Overhead lights come from too far away and too diffused. Light your face from the front at or slightly above eye level.
Skipping background lighting makes your stream look flat. Add RGB strips, fairy lights, or lamps behind you. This creates depth and separates you from the background.
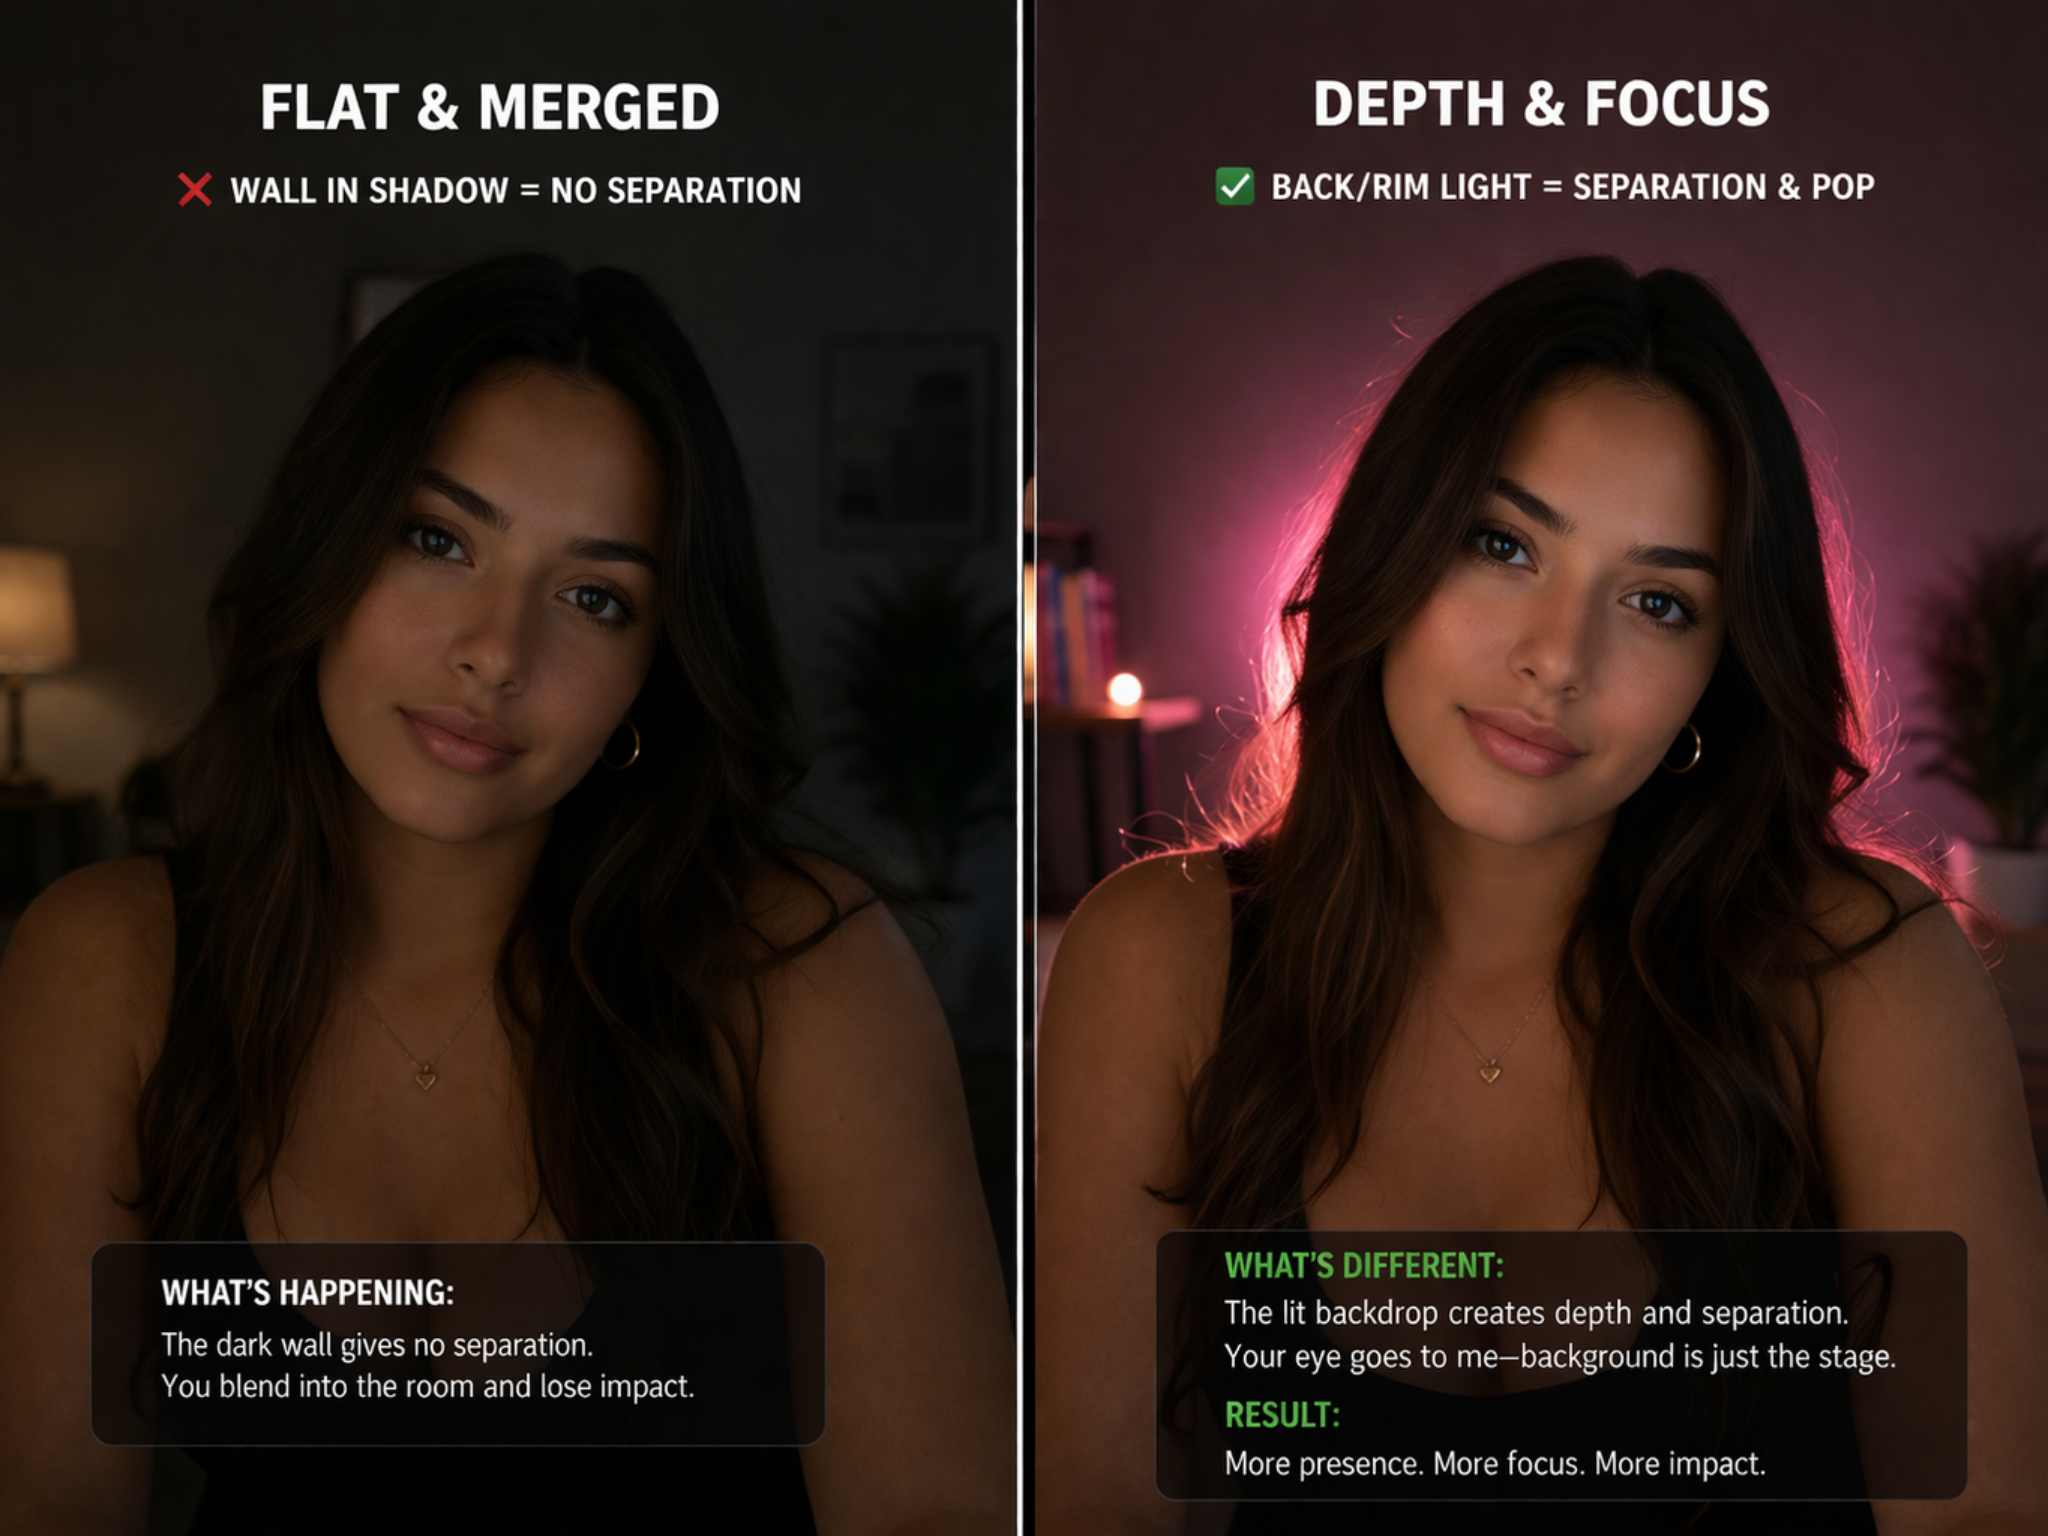
Placing bright lights behind you creates a silhouette effect. The viewer sees your outline but not your face clearly. Your key light must be the brightest source in the frame.
Using harsh, undiffused lighting creates shiny spots and hard shadows on your face. Diffuse strong lights with a softbox or thin white fabric. You can also bounce light off a nearby wall instead of pointing it directly at your face.
Budget-friendly lighting solutions
You can improve your lighting without spending much. These fixes work in small spaces and tight budgets.
Bounce your ring light off a white wall instead of pointing it straight at your face. The wall spreads and softens the light. You get a natural glow without harsh direct lighting.
Use your monitor as a fill light. Increase your screen brightness slightly. This fills in shadows on the opposite side of your face from your key light.
Add warm lamps or RGB lights to your background. This creates mood and depth. Your stream looks more professional when the background has its own lighting separate from your key light.
Keep yourself brighter than your background. Your key light should be stronger than any background lighting. This draws viewer attention to you naturally.
Beginner lighting setup
A basic setup costs between $20 and $40. You need one key light and basic background lighting.
Use a simple ring light as your key light. Place it in front of you, slightly above eye level, angled down. The ring should surround your camera lens if possible.
Add one or two background effect lights. Use lamps you already own or buy a cheap RGB light strip. These lights add depth and color to your room. Point them at your walls or furniture, not at yourself.
This setup gives you clean facial lighting and visual interest in your background. You can stream professionally with just these elements.
Intermediate lighting setup
An intermediate setup costs between $60 and $100. This adds a fill light to balance your lighting.
Keep your ring light or LED panel as the key light. Add a second light or reflective surface as your fill light. A second small LED panel works well. You can also bounce your main light off a white wall to create softer fill lighting.
This setup follows the three-point lighting technique. The fill light softens shadows and creates more balanced, professional lighting. Your face looks more dimensional and evenly lit.
Professional lighting setup
A professional setup starts at $150. This level focuses on quality and control.
Upgrade your key light to a high CRI panel like the Elgato Key Light or Neewer LED panel. These lights give full control over brightness and color temperature. They produce accurate skin tones and stay consistent across long streams.
Keep RGB background lighting for color and mood. Add a soft fill light if needed. High-end panels make the biggest difference in how professional your stream appears to viewers.
Working with natural light
Natural light from windows changes throughout the day. This makes it unreliable for consistent streaming.
If you stream near a window, position yourself facing the window. The natural light becomes a large, soft key light. Never sit with a bright window behind you. This creates the silhouette problem where viewers can’t see your face clearly.
Close curtains or blinds when streaming at different times. This keeps your lighting consistent across streams. Most successful cam models use controlled artificial lighting instead of relying on natural light.
Testing and adjusting your setup
Your lighting needs adjustment based on your camera and room.
Start your camera and watch your stream feed. Check for harsh shadows under your nose and eyes. If shadows appear strong, add fill lighting or move your key light to a better angle.
Look at your skin tone on camera. If it appears yellow or blue, adjust your color temperature. If one side of your face looks darker, adjust your fill light or add a reflector.
Take screenshots at different times during a stream. Compare these to see if your lighting stays consistent. Adjust as needed to maintain the same look throughout your streaming session.
Maintaining your equipment
Lighting equipment lasts longer with basic care.
Keep LED panels and ring lights dust-free. Dust buildup reduces light output and affects color accuracy. Wipe lights with a soft, dry cloth before each use.
Check cable connections before streams. Loose cables cause lights to flicker or shut off. Replace any damaged cables immediately.
Store lights in safe places when not in use. Avoid stacking items on top of delicate lighting equipment. Keep lights away from moisture and extreme temperatures.
When to upgrade your lighting
Start with basic equipment and upgrade as you earn more.
Upgrade your key light first. A high CRI key light makes the most visible improvement to your stream quality. This affects how your skin tones appear to viewers.
Add more background lighting second. RGB panels, LED strips, and decorative lamps create visual interest. These upgrades cost less than professional key lights but add professional polish to your streams.
Upgrade mounting equipment last. Better mounts make adjustments easier but don’t change how you look on camera. Floor tripods work fine until you can afford premium mounting solutions.
Final checklist for webcam lighting
Before you go live, check these elements:
- Your key light sits in front of you at a 20 to 45 degree angle, slightly above eye level. This light is your brightest source.
- All lights pointing at your face use the same color temperature. Warm or cool is your choice, but they must match.
- Your face appears brighter than your background in the camera feed. Viewers should focus on you naturally.
- Background lights add depth and color to the frame. These lights don’t point directly at your face.
- Shadows under your eyes and nose appear soft, not harsh. Add fill lighting if shadows look too strong.
- Your skin tone looks natural and even on camera. Adjust color temperature if your skin appears too yellow or blue.
Good lighting makes everything else in your stream look better. It’s the highest-impact upgrade you can make to your streaming quality.
Frequently asked questions
How do I balance lighting with my webcam exposure settings?
Set your lighting first, then adjust your webcam. Start with your key light at medium brightness and check your camera feed. If your face looks too bright or washed out, lower your webcam exposure or ISO settings in your streaming software. If you look too dark, increase light brightness before raising camera exposure. Higher exposure adds grain, so more light with lower exposure creates better quality.
What’s the optimal distance between my light and my face?
Position your key light two to four feet from your face. Closer creates more intense lighting with harder shadows. Further away softens the light but reduces brightness. Start at three feet and adjust based on your light’s power and the effect you want. Brighter lights can sit further away. Ring lights work best at arm’s length. Test different distances while watching your camera feed.
How do I avoid glare and hotspots on my face?
Glare comes from light hitting your face at harsh angles. Move your key light slightly to the side rather than pointing it straight on. Reduce light intensity if you see shiny spots on your forehead, nose, or cheeks. Use a diffuser over your light source to spread and soften the beam. Matte makeup also helps reduce shine. Adjust your light angle until the brightness looks even across your face.
Can I use colored lighting while keeping my face clear?
Use colored lights only on your background, never on your face. Your key light and fill light must stay white or warm white to show accurate skin tones. Place RGB lights behind you to add mood and color to your background. This creates visual interest without distorting how you look. Viewers need to see your natural appearance clearly, so colored face lighting reduces stream quality and makes skin tones look strange.
What are light diffusers and do I need them?
Diffusers are materials placed in front of lights to scatter and soften the beam. Softboxes have built-in diffusion. You can add diffusion to bare LED panels or ring lights using thin white fabric, professional diffusion sheets, or frosted shower curtains. Diffusion eliminates harsh shadows and creates flattering, even lighting. You need diffusion if your light creates sharp shadows or makes your face look too shiny or severe.
How do I create dramatic lighting for special shows?
Use strong side lighting with minimal fill light to create drama. Position your key light at a 60 to 90 degree angle from your face instead of the standard 20 to 45 degrees. Keep your fill light very dim or turn it off completely. Add colored background lighting for mood. This creates strong shadows and contrast. Dramatic lighting works for special events but use standard three-point lighting for regular streams.
Should I adjust my lighting differently for daytime vs nighttime streams?
Keep your lighting setup the same regardless of time. Close curtains or blinds to block natural light from windows. Natural light changes constantly and creates inconsistent results across your streams. Your artificial lighting should be your only light source day and night. This gives viewers the same experience every time they watch. Consistent lighting builds your brand and looks more professional than constantly changing conditions.