Camera Angles for Webcam Models: A Complete Guide
Getting your camera angle right makes the difference between looking professional and looking amateur. The position of your webcam affects how viewers see you and whether they stay to watch your stream. This guide covers the best camera angles for cam models and how to set up your streaming space.
Why camera height matters
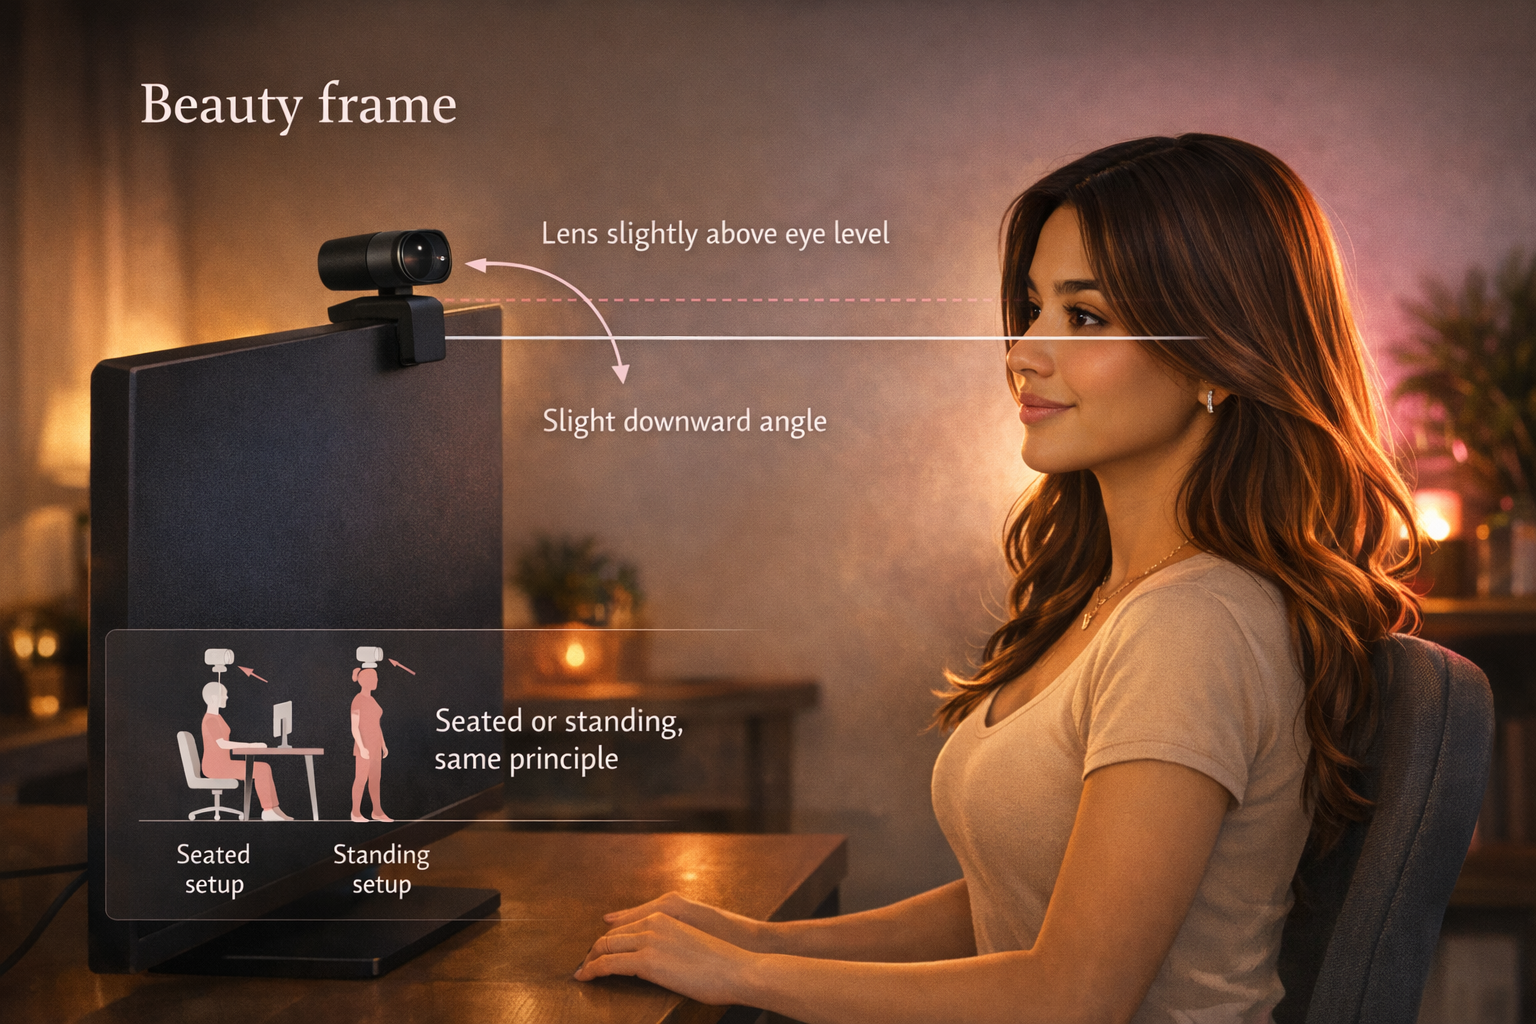
Your camera position changes how your face appears on screen. A low camera angle points up at your chin and nostrils. This creates an unflattering view that makes you look worse than you do in person. A camera placed at eye level or slightly above gives viewers a natural view of your face.
Place your webcam at eye level or just above your hairline. If your laptop sits too low, stack books or boxes underneath to raise it. The camera should never point up at you from below. When you position the camera correctly, viewers see your face clearly without looking up your nose or at the ceiling behind you.
Test different heights before you start streaming. Look at yourself on screen and adjust until you find the angle that works best for your features.
Setting up your camera position
The placement of your camera determines whether you look professional or careless. Most cam models use a laptop webcam or external camera mounted above their monitor. The key is getting the camera in the right spot so you can lean toward it during your stream.
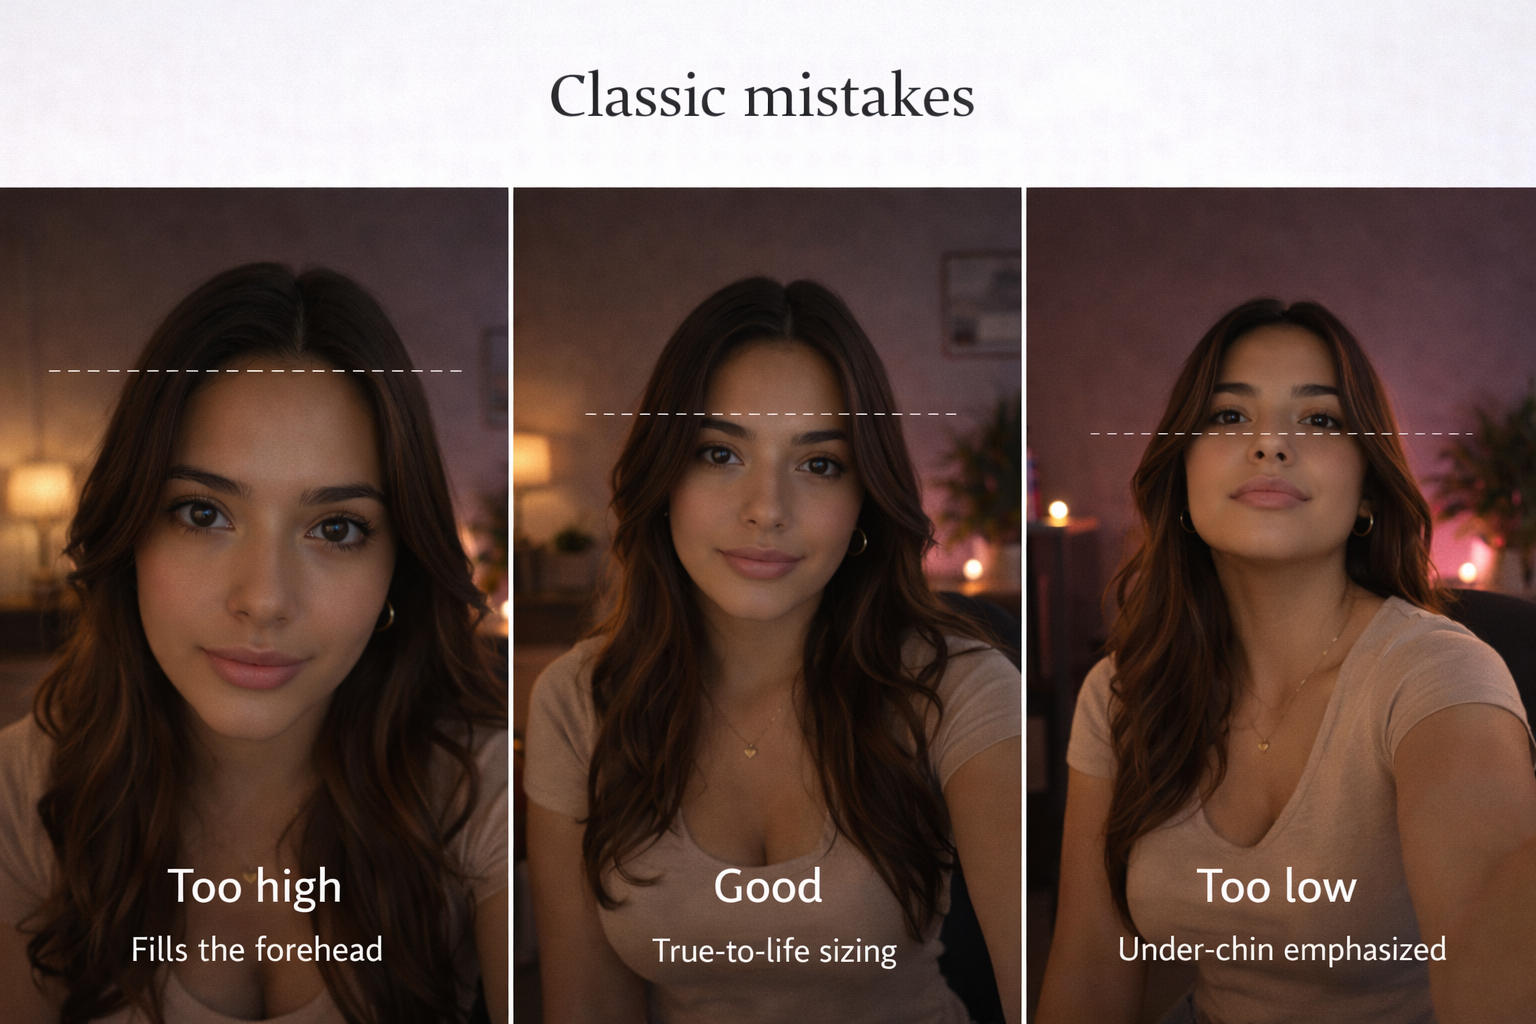
Center yourself in the frame. Your head and upper torso should fill most of the screen without cutting off the top of your head. Leave minimal space between your head and the top edge of the frame. This keeps viewers focused on you instead of empty space or your background.
Position the camera so you can lean forward comfortably. When you lean in, your face fills more of the frame and you look more engaged. Leaning back makes your midsection look larger because it sits closer to the camera.
Framing your shots for cam streaming
How you fill the camera frame affects viewer perception. The frame should show your face clearly along with the top portion of your body. Avoid placing your face at the bottom of the screen or leaving too much headroom at the top.
For desk-based streaming, position the camera to capture from your waist up. This works well for most adult content because it shows your upper body while keeping you centered. If you move around during streams, adjust the camera angle to capture more of your space.
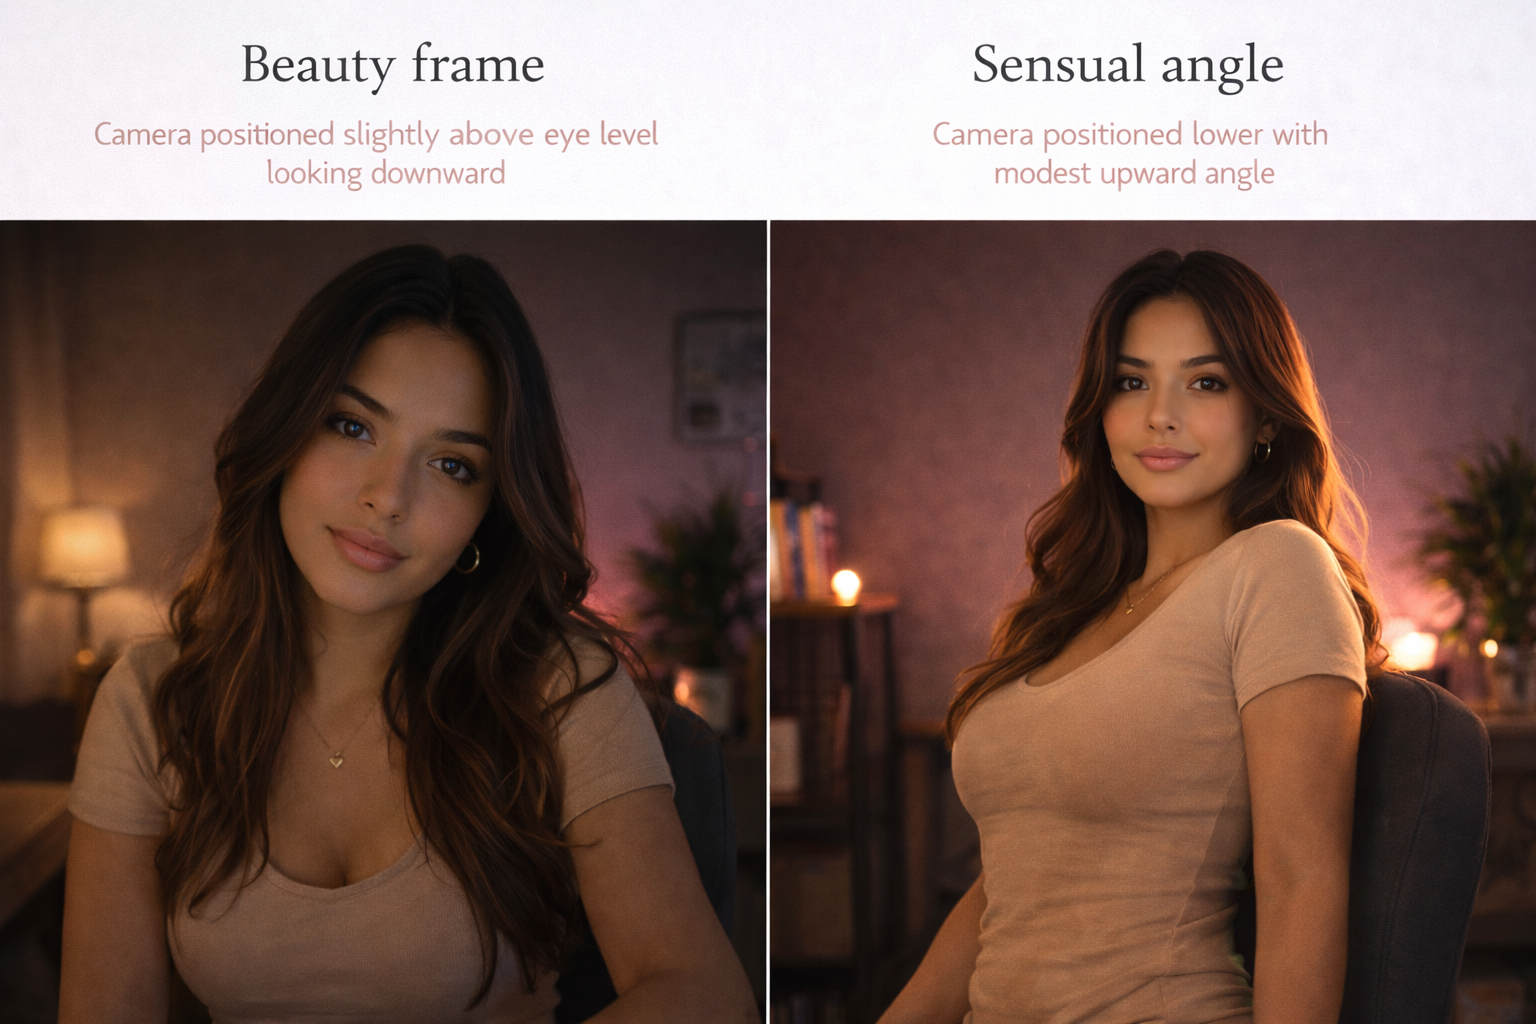
Side angles can work if you have a second monitor. One streamer places her camera on a side monitor at a 45-degree angle. This creates a profile view and lets her glance at chat naturally. The slight side view can be more flattering than a straight-on angle.
Keep your background neutral and clutter-free. Viewers should focus on you, not the items behind you. Some cam models set up against a plain wall to eliminate distractions.
Lighting setup for better camera angles
Good lighting works with your camera angle to improve video quality. Without proper lighting, even the best camera angle looks flat and dark. Light sources should be positioned to eliminate shadows on your face.
The standard three-point lighting setup uses two lights in front and one behind. Place lights on either side of your camera, angled down toward your face. This creates even illumination without harsh shadows. The back light helps separate you from your background.
Position lights above or beside your camera, not below it. Lights placed below create strange shadows that make you look unnatural. Keep lights at the same height as your camera or slightly higher.
If you use natural light from a window, sit facing the window so light falls on your face. Window light creates soft, flattering illumination. The drawback is that natural light changes throughout the day and disappears at night.
Diffuse bright lights to reduce harsh spots on your skin. Point lights at a wall to bounce soft light back at you. This technique works well if you want to soften your features.
Advanced camera positioning
Some cam models use multiple cameras to show different angles during their streams. A two-camera setup lets you switch between views, which keeps viewers engaged. One camera captures your face while another shows a wider view or a different angle.
Position your primary camera at eye level in front of you. Place a secondary camera to the side or above to capture a different perspective. You can switch between feeds to show close-ups or full-body shots.
For under-desk streaming, mount a small LED panel below your desk surface. This eliminates shadows under your chin and lights your lower body. Keep the brightness low to avoid overexposure.
A camera mounted on a tripod gives you flexibility to adjust angles during your stream. You can raise or lower the camera, tilt it, or move it to different positions. This works well if you stand up or change positions frequently.
Best camera angles for cam models
The most flattering camera angle for webcam models sits at eye level or slightly above. This creates a natural view that matches how people see you in person. Angles slightly above eye level slim the face and define the jawline.
Experiment with angles between your eye level and your hairline. Small adjustments make a big difference in how you appear on camera. Record test footage and review it to find your best angle.
A 45-degree side angle works for some models. This shows your profile and can be more interesting than a straight-on view. You can glance toward the camera to engage viewers while maintaining the side angle.
For full-body streams, position the camera further back and higher up. This captures more of your body while keeping you centered. The camera should still angle down slightly to avoid shooting upward.
Common camera angle mistakes
Many new cam models make the same positioning errors.
A camera placed on your lap or on a low surface creates an unflattering upward angle. This makes your chin look undefined and shows too much of your nostrils.
Avoid backlighting from windows or bright lights behind you. This makes your face appear dark while the background stays bright. Move your setup so light hits your face, not your back.
Don’t position yourself off-center in the frame. Viewers expect to see you in the middle of their screen. Sitting to one side looks unprofessional and makes it harder for viewers to focus on you.
Placing the camera too far away makes you look small in the frame. Viewers want to see your face clearly, not a tiny figure in the distance. Keep the camera close enough that your face and upper body fill most of the screen.
Equipment for better angles
The right equipment helps you achieve professional camera angles. An external webcam gives you better quality than most laptop cameras. External cameras also provide more flexibility in positioning.
Use a webcam with at least 1080p resolution. Lower resolution cameras produce grainy, unclear video that makes you look unprofessional. Higher resolution captures more detail and looks sharper on screen.
Mount your webcam on a tripod, gooseneck mount, or stack of books. A flexible mount lets you adjust the angle without moving your entire setup. Some cam models attach their camera to a wall-mounted arm for easy positioning.
Add LED ring lights or panel lights on either side of your camera. These create even lighting that eliminates shadows. Look for lights with adjustable brightness and color temperature so you can match your room lighting.
Creating a dedicated streaming space
Set up your camera in the same location each time you stream. Pick a spot with good natural light or space for your lighting equipment. A dedicated streaming corner saves time because you don’t need to rebuild your setup before each session.
Choose a location with a clean background. A plain wall works better than a cluttered room. If you want a more interesting background, add a few props or decorations that fit your brand.
Mark the position of your camera and lights with tape on the floor or desk. This ensures consistent angles across all your streams. Viewers expect to see you in the same position and lighting each time.
Keep your streaming space organized. Store equipment nearby so you can set up quickly. Good organization makes it easier to maintain professional angles and lighting every time you go live.
Angles for cam streaming success
Your camera angle directly impacts your earnings as a webcam model. A well-positioned camera makes you look professional and attractive. Poor angles drive viewers away before you have a chance to engage them.
Start with your camera at eye level and adjust from there. Add proper lighting to eliminate shadows and create even illumination. Test your setup before going live to ensure everything looks good on screen.
Pay attention to framing, background, and composition. These elements work together with your camera angle to create a professional stream. Small improvements to your setup lead to better viewer engagement and higher tips.
Frequently asked questions
What camera angle creates an intimate versus professional look?
A closer, eye-level angle with tight framing creates intimacy by bringing viewers closer to your face. Professional looks use slightly elevated angles with more space around you, showing your upper body and workspace. Intimate angles focus on facial expressions and eye contact. Professional setups include wider framing that shows your environment. The distance from camera and how much of your body fills the frame determines the mood you create.
Should I use different angles for talking, dancing, or posing?
Yes. For talking, use an eye-level angle that captures your face and upper chest. Dancing requires a camera positioned further back and higher to show your full body movement. Posing works well with varied angles—try both straight-on and 30-degree side angles. Position the camera lower for full-body poses and higher for close-up portrait-style shots. Adjust your camera distance and height based on your activity.
What’s the best camera angle for standing versus sitting positions?
For sitting, place the camera at eye level or slightly above, two to three feet away. Standing requires positioning the camera higher and further back to capture your full body. The camera should sit at chest height when you stand. Use a tripod with adjustable height to switch between sitting and standing angles easily. Standing angles need more room behind you to keep proportions natural and avoid distortion.
How do I adapt my camera angle for close-up versus wide shots?
Close-up shots need the camera at eye level, positioned two feet away, showing your face and upper chest. Wide shots require moving the camera back four to six feet and raising it to chest or shoulder height to capture your full body. Tilt the camera down slightly for wide shots to avoid cutting off your head. Close-ups emphasize facial expressions while wide shots show movement and your full presence.
Where should I position my ring light relative to my camera angle?
Place your ring light directly behind and around your camera lens so light hits your face evenly. The ring light should sit at the same height as your camera—at eye level or slightly above. This eliminates shadows and creates even illumination across your face. Mount the camera in the center of the ring light. Keep the ring light close enough to eliminate shadows but far enough to avoid overexposure.
How do I combine key lights with side camera angles?
Position your key light on the opposite side from your camera to create depth and dimension. If your camera sits at a 30-degree angle to your right, place the key light to your left. Add a fill light near the camera to soften shadows created by the key light. This setup adds a three-dimensional quality to side-angle shots. Adjust light intensity so the key light is brighter than the fill light.
What camera angle works best with natural window light?
Position your camera so you face the window with light falling on your face. Place the camera between you and the window at eye level. This creates soft, flattering illumination. The window should be to your side or in front of you, never behind you. Natural light works best with straight-on or slight side angles. Avoid extreme side angles with window light as they create harsh shadows on half your face.
How do I avoid shadows when changing camera angles?
Use multiple light sources positioned around your camera to fill in shadows from different angles. Place lights at the same height as your camera or slightly above. When you move your camera to a side angle, adjust your lights to maintain even illumination. Test your lighting setup after each camera adjustment. Bouncing light off walls creates softer shadows that work with any camera angle you choose.
What gestures or movements should I avoid with my camera angle?
Avoid leaning back in your seat as this makes your midsection look larger and your face smaller. Don’t tilt your head down when looking at your screen—this creates an unflattering double-chin effect. Skip sudden movements toward or away from the camera as these look jarring. Avoid turning your head too far to the side if using a front-facing camera. Keep movements smooth and stay within the frame your camera captures.
How do I maintain a consistent angle during long streaming sessions?
Mark your camera position with tape on your desk or floor. Use a tripod or fixed mount instead of handheld positioning. Check your preview monitor regularly to ensure you haven’t shifted out of frame. Sit in a chair that doesn’t swivel or roll. Place foam pads or marks on the floor to show where your chair should stay. Set up physical barriers to prevent accidentally moving closer or further from the camera.
What angle elongates the face on webcam?
A camera positioned slightly above eye level elongates the face and defines the jawline. This angle requires tilting the camera down at you while you look up slightly toward the lens. Position the camera between your eye level and hairline. Keep your chin level rather than tilted up or down. This downward camera angle stretches the face vertically and creates a slimming effect that flatters most face shapes.
How do I position my upper body to work with my camera angle?
Sit up straight with shoulders back to avoid slouching into the camera. Keep your chest open and facing toward the lens. Position your torso at a slight angle if you want dimension—a 15-degree turn adds depth without hiding your face. Leave space between you and the camera so your entire upper body fits in frame. Lean forward slightly from the waist to engage viewers while keeping your shoulders back and posture strong.
What camera angle should I use for full-body cam streaming?
Position your camera four to six feet away at chest or shoulder height. The camera should point slightly downward to capture your full body without distortion. Center yourself in the frame with equal space on all sides. Stand or sit on a stool that positions you in the middle of the frame. This angle captures your entire figure while keeping proportions natural. Test the distance to ensure nothing gets cut off.
How high should I raise my webcam for the most flattering results?
Raise your webcam to sit between your eye level and your hairline. Most models find the sweet spot about two to three inches above their eyes. This height slims the face and defines the jaw without creating an unnatural downward angle. Stack items under your laptop or use an adjustable stand. The camera should tilt down at you at a subtle angle. Test different heights and record short clips to compare results.